
This is going to be a track record of my attempt to build a Human Powered Helicopter that I have been designing on and off for the last 14 years or so. (If you are reading this for the first time, read it from the bottom up)
The main areas I have been working on are 1) Power Transmission 2) Overall helicopter structure and 3) Rotor Blade design.
Movie
Clip from a rough prototype. Oregon, 1994 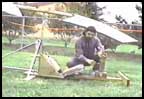
Movie Clip from another prototype. Florida May, 1996 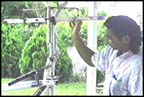
Sept 10, 2009
After a bit of a lag Im posting here again, I have been working on the heli albeit, on and off since my last posting but have made progress on my transmission. The prize money for the contest ent up from $20,000 to $250,000 a much bigger incentive. This will also spur other competiors into the fray so I am amping up my prototype schedule to beat them out:)
May 11. 08
(A bit of a lag in my blog posts, but been busy working my regular job so I can afford to continue with this project)
I was finally able to put my bicycle wheel gear train together to at least test it, and one of the problems I was afraid of in that design came about. On my first set of wheels I was getting a good gear ratio but when I added the third wheel, I could not budge the primary wheel without a lot of effort and when I did get it to move it just slid on the hub of the next gear. what occurred was that though my gear ratio would have given me 2,000 plus rpms by the large gear ratios, but it also multiplied back the other direction the amount of force needed to move it. Just for an example, a one ounce resistance on the gear train could equal to many hundreds of pounds of force needed to move it. The reason for this is simple physics; a gear train acts as a type of lever, like a see saw. The closer you put the fulcrum to the force applied end, the more force is needed to move X amount of weight at the other end, but that end goes up much faster than the speed which is used to push down the other end.
I had figured that the backwards force would be very high but didn't figure it to be so high hat the rubber wheels could not engage.
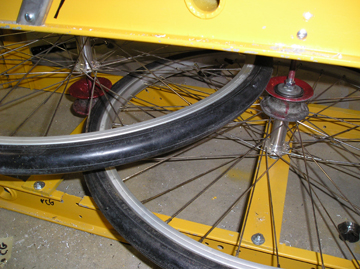 picture of tire gears (larger image)
So my next step is to create a tooth gear system that will engage without slipping. I took one of the rims, removed the tire and inserted bolts and I'm making a gear to fit.
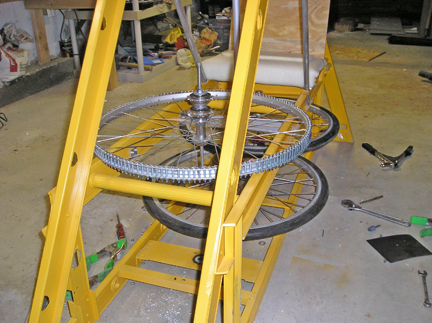 (larger image) Gears in process of getting 'teeth', a very painstaking process!
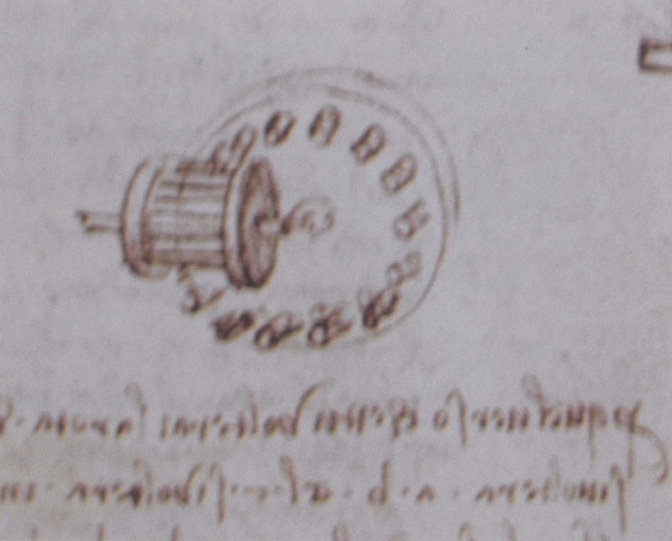
What's interesting is that this is similar to the gear design that Da Vinci penciled out for many of his mechanical devices!
 (larger image)
 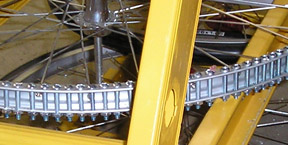 close up of my gear
April 10. 08
I did a center of gravity test with co-pilot Jocelyn and it was within a few inches of my expectations. We also checked her body placement, legs and arms and general ergonomics and it was all A-Ok. The way center of gravity was determined was by using a thick wooden rod and rolling the frame with pilot over it until a balance point was achieved, that point was then marked on the frame.This method was easier and safer to do than suspending the whole apparatus off a ceiling beam. The purpose of this is to center the weight of the frame plus pilot weight as close to the shaft as possible.The center of the shaft is also the center of the two rotor blades. Since I am using a rigid rotor design, the tolerance band for the center of gravity is lower than other more flexible (albeit more complex) rotor hub systems. In this case, if the center of gravity was off by a substantial amount then the helicopter would tend to move in that direction, not a bad thing in itself, but the contest requires that the helicopter stay within a marked area on the ground.
The next immediate phase is to put together a working transmission and test for my targeted 3,000+ rpm's for the tip propellers. This is the target I set for myself to achieve before my birthday, April 26. Next step after that is to start production on the rotor blade, and after that...test flight!
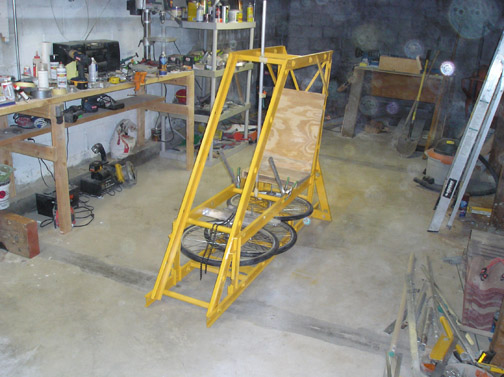 Airframe with most of the transmission put in. (click for larger image)
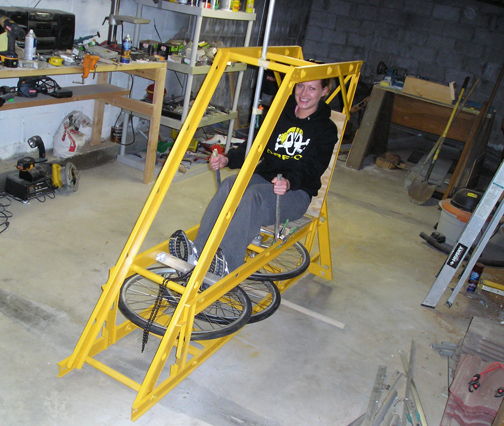 Airframe with test co-pilot Jocelyn. (click for larger image)
April 9. 08
I am putting the finishing touches on my main frame...
 (click for larger image)
 The transmission is not installed yet. Tomorrow I am going to have my alternate pilot (who has the same height and weight as my daughter) come over and do a center of gravity (CG) test, so I can put the pilot seat as close to the CG as possible.
March 18. 08
Did a couple of melts today. I redid the mold process and the results were much better.
Here are a
series of pics of it 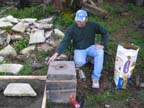
March 4. 08
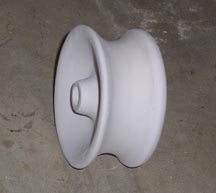
First melt. Fired up my furnace for the first time and furnace worked fine. My mold however could have been better. I'm lacking a burn out oven so some residual wax was in the mold which made the pour bubbly. It was smoking and spilling over and flames going ever which way. I thought it was going to be a complete disaster. However after I removed the investment plaster the gear hub piece was actually not that bad. If I had to with a little work I could make it functional.
 (The part sticking up is the remains of the sprue, or intake opening)
March 4. 08
Rotor Test:
I 'wind-tunnel tested' my rotor blade design today and it exceeded my expectations! At 50mph I had a hard time holding on to it with both hands. It is of course hard to judge exactly how much lift I achieved, since I didn't have it attached to a calibrated test bed hooked up to a super computer. Also I have very strong arms so my results are very subjective. Suffice it to say, that I got at least 10 times more lift out of my radical new design then I did when I similarly tested a more conventional airfoil. Here's my subjective (conservative) results for the 12" rotor blade area prototype:
20 mph = 3-4 lbs of lift, at 30 mph = 10-15lbs lift, at 40 mph 20-25 lbs lift, at 50 mph 35+ lbs of lift.
What this does is give me is a better idea of disc loading, what my rotational speed must be minimum and max, and length of rotors. I also tried different pitch angles and I'm now ready to start templating my final design.
Feb. 28. 08
After many many years working on this project over two states, I got fired up recently to get it done finally. What lit that fire was a call from a producer of TV shows for the History Channel. I talked to them over the phone (they are based in England) and exchanged emails. However after an initial interest I have not received any further contact. The reasons for this could be one of several...A) They probably decided against doing a documentary on this due to lack of interest or material, B) they found a more advanced competitor and are going with their project or C) they think I'm a total kook:)
But none of that matters since I am going ahead full bore on this project, not to try and get on the History Channel, but as a challenge to myself. Of course, if this flies, I will get major air time and be newsworthy anyway:)
Feb. 28. 08
Through my web site link checker, I saw that a French site has my heli picture on top of their human power web site and link to my web site from it.
http://ihpv.free.fr/index1.php?mainpage=http%3A//ihpv.free.fr/myihpv/pdf/helicoidalHPV.html
Feb. 27. 08
Received my aluminum ingots in the mail. In the process of getting my wax copies ready for plaster investment. Meanwhile, I am also working on a rotor prototype section I can test. Through my mental mock ups of it, I envisaged some design problems and working through those. It's possible that in fixing some of those problems I may also make it more efficient.
Feb. 20. 08
I found a foundry company online that sells aluminum ingots, they are on order and I should receive them later this week. The crucible is done, ready to get fired up. I have two of the gear hubs duplicated in wax so far, will have the last one done today. I found a place locally that sold investment plaster, so the stage is set to start melting and pouring molten metal:)
Rotor Blade blah blahs...
I want to talk a little bit about my rotor blade design that I finally settled on. Aside from the power transmission and weight issues, rotor blade design is a vital criteria. If all other things are in place and your blade doesn't produce lift at low rpms, then you are a pigeon without wings.
To insure I was not doing this too much by the seat of my pants, I got two airfoil design programs which took real NACA (code name and numbers for airfoil specs) airfoils and tested them at different speeds etc. I settled on one that worked well for low speed applications and did some 'wind tunnel' testing (i.e. sticking my airfoil out of a window in a moving car). However, I still had some concerns about making the rotor blade light and strong enough and of proper length to insure lift without excessive coning (the angle of the blades upward in the air due to vehicle weight. Coning equals lost in lift).
Recently while researching airfoils online I came across an article about the true nature of airfoil aerodynamics. Basically it lays out that Bernoulli's Principle (about the difference in airspeed and pressure between the top and bottom parts of a wing) does not account for the amount of force of the actual wing lift. After reading this I had an epiphany and solved the problems I had with my wing structure and also revitalized an earlier rotor blade design. The result is a rotor blade design that I believe will work and if it does, will be something I have never seen in all of my studies on low speed rotor blade design.
I finalized my rotor blade template last night and today will produce a mock up of my rotor blade design and I will test it this weekend in my portable air tunnel.
Note: I will not divulge this rotor blade design until the day of my contest. This is a contest after all and I don't want to give my competitors any ideas:) But I will let you know if it works.
Feb.11. 08
Built the crucible furnace today, now to score some aluminum.

I was looking over my older video tapes from my first prototyping and I realized how far along I've come. Originally I was concentrating on increasing RPM speed by adding tip weights to the ends of the rotor blades to turn the rotor blades into a flywheel, giving the rotors centrifugal - angular momentum. The main flaw was, of course, the added weight, but mostly it was shaft powered which would have needed a counter tail rotor (counter-torque), again adding more weight. My design now is going to use tip propellers powered internally so that there is no shaft torque, eliminating the need for a tail rotor.
Feb. 10. 08
When I get a chance I will make a digital web copy of a video tape of my first wooden heli demo which illustrated some of the ideas I had at the time. I am doing this project totally different from the other competitors, i.e., I have a low budget, I am not an engineering college student, I don't know how to fly a helicopter (actually never even flown in one as a passenger:). I am self taught on aerodynamics pertaining to this project. My main occupation is in construction - roofing, small remodels, etc. My helicopter frame is made from the sides of an aluminum ladder and my rotor blade skins will be made from aluminum gutter metal stock.
However, I have always been interested in the sciences and if not for the circumstances of my upbringing and early schooling, could easily have made it to MIT. I am also an artist, and as such, I am used to bringing visualizations to life. I am approaching this in the spirit of Leonardo Da Vinci, using low tech materials at hand to realize a high tech concept.
Feb.7. '08
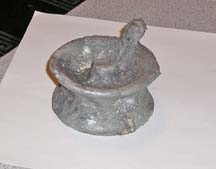
Finished the master template for my wheel gear assembly (image below). I am currently building a crucible furnace to melt aluminum to make copies of this part. I hand crafted this piece out of plaster. Actual size is about 3 inches. I'll use this piece to make a wax mold, then use that in the lost wax process to make my aluminum copies.
Feb. 5, '08
Today I used a lathe to fashion the template for a gear wheel assembly. I also procured materials to build a crucible furnace which I will use to melt aluminum for casting various custom parts I will need.
Feb, 2008
I'm starting this blog to document the process and progress on my road to try and win the Human Powered Helicopter contest. I have been in progress on this, so I'm starting this blog 'mid-sentence' before I get too far ahead..